 A hack? What is a hack? Asked the Dowager Countess, twitching with involuntary indignance. The word, hack… humph! Unmelodious.
Why, yes… unless of course you are trying to rhyme it with Celiac.
ENTER SERIOUS DAPHNE
So why are we discussing autoimmune disorders that cause eventual disintegration of the small intestine on this blog? Well, first of all, because I’m creepy like that. But more importantly, because this particular autoimmune disorder involves a severe allergy to gliadin, and therefore- gluten.
FAT GUY IN AUDIENCE: Huh? What the heck is this, a science lesson? Can we just have some food already?
Well, sort of. But this is REALLY important, so pay attention. I won’t take long, I promise.
Wheat, like other seeds, contains protein. In wheat, two major components of this protein are gliadin and glutenin. When flour, which is made from crushed wheat seeds, is combined with water and kneaded, these two compounds attach to each other on a submicroscopic level to form an elastic network, which is (ready for the catchphrase?) Gluten! Gluten is what gives dough its stretchy, squishy goodness. It’s also what helps keep your cookies and cakes from disintegrating. Oh- and the gliadin in gluten it’s what gives celiacs painful, explosive diarrhea- putting you, the unwitting host, on their crap list (literally) forever. How’s that for unmelodious? Or just odious, period.
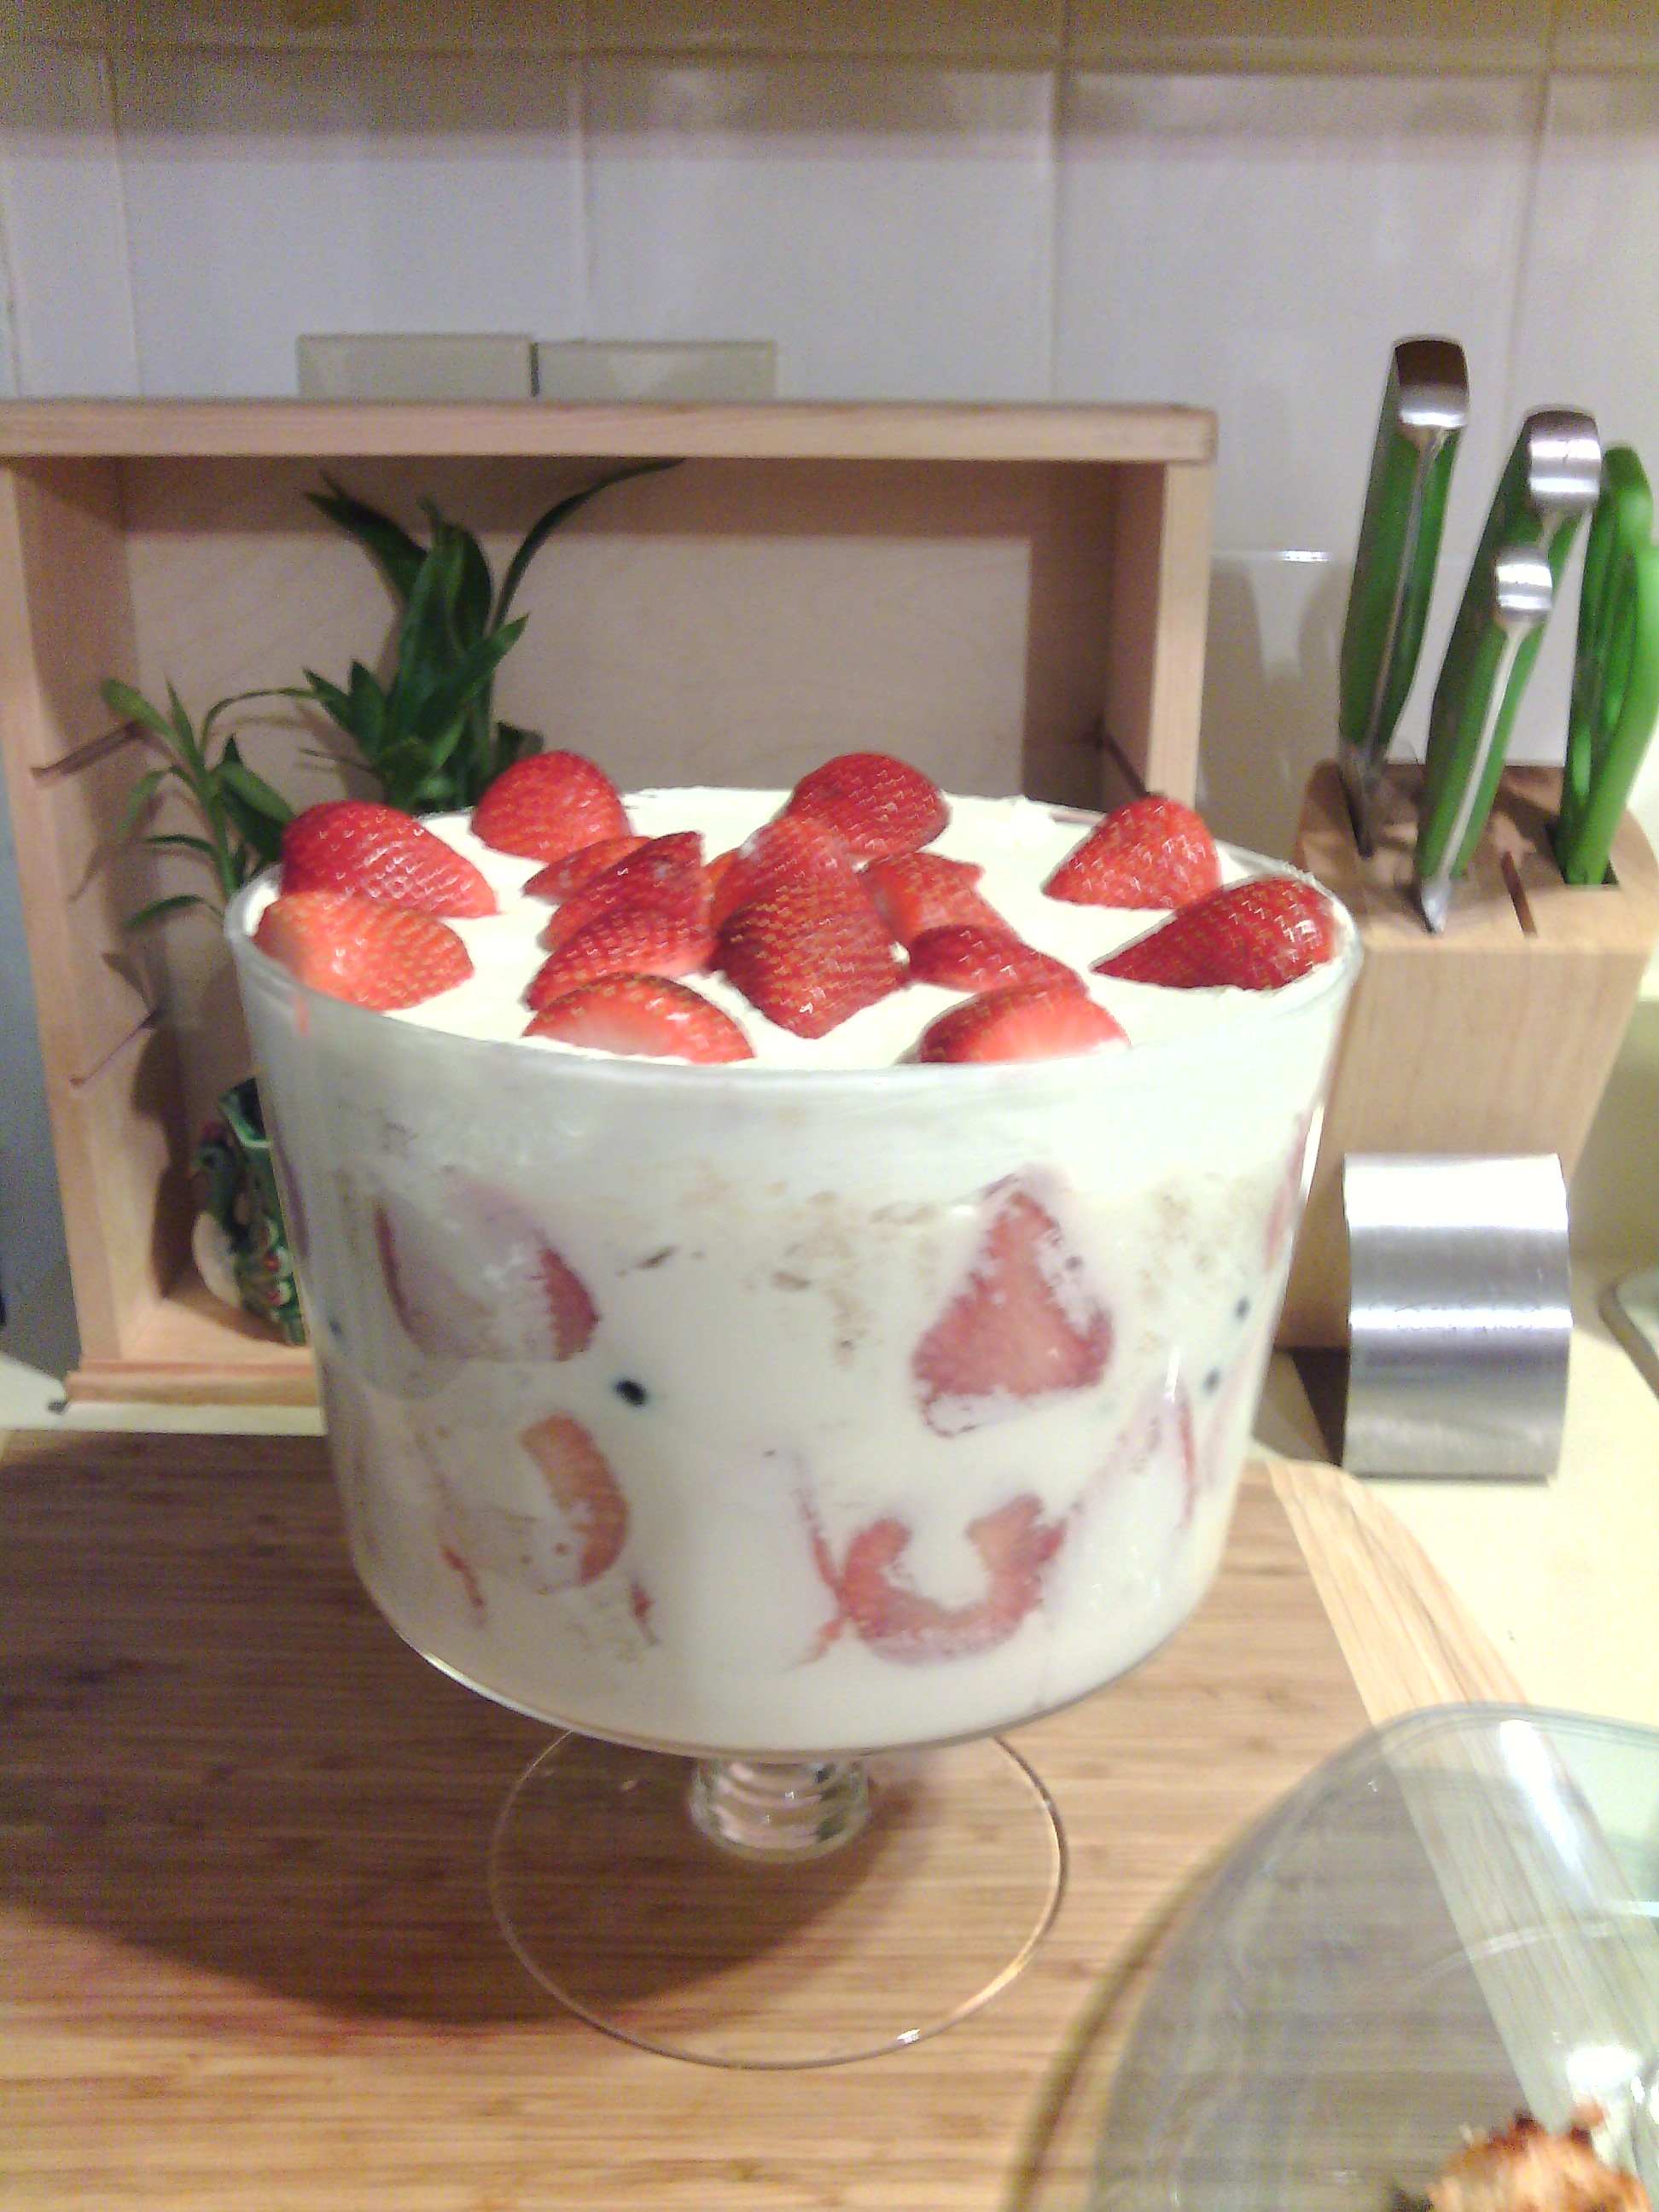
So let me introduce you, and the dramatic ghost of our dear dowager, to this delicious little recipe hack. I made this for a Downton Abbey themed party, and it went over very well! As many of you know, traditional English cuisine is not exactly friendly to celiacs. So, for those of you who don’t share the same fondness for the staff of life I present the following gift: Gluten Free English Trifle.
Yes, I’m serious. And yes, it CAN be done! I realize it was only a week ago I promised the recipe comes first, but would you settle for “middle”? Just until I get a handle on this whole food blog thing. Sadly, it occured to me to post this way after I made the recipe, so it is a bit sparse on photos. I’ll try to be more dilligent in the future, guys!
EXIT SERIOUS DAPHNE
Directions For Advanced Cooks
Here’s a Rough Layout of what we are doing, the day/night before our party. This takes about 2.5 hours, depending on how organized or disorganized (ME!) you are.
- Make/Bake your favorite GF yellow cake, in a rectangular baking pan.
- Put it on a rack to cool while you wash strawberries and blueberries.
- Cut the strawberries into slices, or round- whatever you like the most! Reserve some uncut on the side, for the topping.
- Cut up the cake into cubes, rectangles, wedges, or decagons, for you math nerds. Just make sure it is totally cool.
- Start arranging the layers of your trifle. If you want you can dunk the cake cubes in cream before settling them in place. Some people also smear them with jam, but I didn’t do that. Once you have your little design all set up to your liking, make the panna cotta.
- Pour the liquid pannacotta over the top, trying not to disturb your cake layout too much. You’ll notice that things are now floating. Don’t worry. [ If this deeply disturbs you, then give yourself enough time to make/chill each layer of the trifle individually]
- Chill until it’s solid. Depending on your fridge, this could be 3 hours, it could be overnight. Don’t worry. If you did what I told you, which is make this the day before, you have plenty of time.
- The cake pieces that floated to the top, by now, are slightly dehydrated looking. At this point you can do one of two things: A) Slice the crusty bits off with a sharp knife, and eat them! Then, camouflage the “raw” top of your trifle with a generous layer of whipped cream and sliced strawberries. No one will know. B) Make a small batch of panna cotta and pour over the top, to cover the “raw parts”. Chill until firm, for a clean, smooth surface. If you don’t plan on using whipped cream or elaborate strawberryscapes to finish your dessert, this is the way to go
- Take it to your party. Make sure you parade around with it so everyone can fawn over it. Oh, and don’t forget to dollop out a generous portion for your celiac friend. Chances are, they don’t get to eat things like this very often 🙂
And, for the rest of you: Here’s the recipe!
This will fill up an 8”-9” trifle bowl, or probably about 10 drinking glasses. Remember, it is best prepared the night before, unless you happen to like soggy cake floating in half-cooked milk. While the recipe is work intensive, it is absolutely worth it. I’ve broken it into three parts: Cake; Assembly I; Panna Cotta; Assembly II.
And of course, you will need a trifle bowl. Cause, you know, if you put this in a normal bowl-trifle’s kinda pointless. If you seriously can’t find a trifle bowl, then a glass container that is fairly deep will do. Oh, ok. Well if you don’t have anything glass… considering where it’s going to end up in a few hours, don’t worry about it. STOP OBSESSING (but do check my Tumblr for ideas!)
A. Cake
This recipe hails in part to a generous poster over at food.com. I’ve hacked it somewhat, but if you’d like to go give them some love, here is their original post.
- Gluten Free Baking Mix- 2 Cups plus a little for dusting the pan. (I used Pam’s Gluten Free Pancake and Baking Mix)
- Vanilla- to taste for the Panna Cotta, but no less than 1/2 teaspoon for the cake. I like a little more.
- Eggs- 3, Separated
- Butter- 4 Tablespoons unsalted, Softened
- White Sugar- 1 Cup, plus one tablespoon. (Hackable: If you have objections, use Agave or Honey- but taste and go to get the right sweetness)
- Baking Soda- I put in just under a quarter teaspoon because I was using Pam’s Mix. If you are using a non-leavened baking mix, up the amount to 1-1.5 teaspoon. Don’t obsess over this too much, the cake is going to be floating in cream, so no one will notice. Plus, it’s gluten free so no one expects it to be exactly like a traditional cake.
- 1-2 Handfuls of almond flour or other nut flour, to taste. I added this in just to make the flavor a little richer.
- Preheat oven to 350 degrees.
- Grease a Square or rectangular pan with butter and use baking mix to coat. Ideally you want one that is only 2-3 inches deep, but don’t worry too much about this. We are cutting it up, anyway!
- Separate eggs and whip egg whites until stiff.
- In a separate bowl, place softened butter, baking mix and white sugar.
- Blend for 1 minute on medium speed or until the butter is distributed thoroughly.
- Add 1/4 cup milk with vanilla and mix for 1 minute on medium speed. Taste. Add more vanilla.
- Add your handfuls of Nut Flour and
- Add remaining 1/4 cup milk with the egg yolks and mix for 1 minute on medium speed.
- Fold in stiff egg whites.
- Pour into prepared pan.
- Bake for 25 minutes, and avoid opening oven door while baking.
- Cake is done when it springs back to the touch, or when a knife stuck into the middle comes out clean.
- Let cool until pan is warm to touch (not hot), run a knife around the inside edge of the pan to loosen.
- Invert onto a cooling rack, and leave until completely cool. Jump ahead to your strawberries/blueberries, in “Assembly A”, then come back to step 15, below
- Once cake is totally cool, trim off any burnt ends. Then begin cutting the cake into small cubes, triangles, wedges or any other shape you think will be appealing. Just make sure you don’t cut them too large. Remember- this is a trifle, not a layer cake in a jar. Proceed with Assembly, Part I- for good.
B. Assembly, Part I.
- Two Containers Organic Strawberries
- Two Containers Organic Blueberries (small or large, doesn’t matter)
- Cut Up Cake Cubes
- Optional: Jam or Cream
- 1/2 Tbspn of sugar
- Thoroughly wash Strawberries and Blueberries, in the way that induces the least level of fruit-borne pathogen paranoia for you, personally.
- Drain, and pat with paper towels
- Proceed to trim strawberries of any leaves. At this point, it is up to you to decide on the texture of your strawberries. For the inside, smaller pieces are usually best, so your eater gets the full benefit of the blended flavors in the dish. For decorating the sides (which will show through the glass) Thin slices are best. Once you’ve thought about this for a little bit, slice up your strawberries.
- Sprinkle strawberries with sugar.
- Now you begin assembling the trifle. The first thing you want to do, is line the bottom of the pan with cake pieces. If you want to dip the cake pieces in cream before settling them in, or smear them with a little jam, it is entirely up to you. (Some people even soak in rum!) I didn’t personally, to keep the amount of sugar down.
- Follow the cake pieces with a sprinkling of blueberries and a layer of strawberries.
- If you want, you can start “sticking” strawberry slices and cake pieces to the sides of the glass, where they will be visible when the Trifle is finished. (Again, you can get arrangement ideas on my Tumblr, or via any google search, really) Take a minute to think about what a mouthful of this should feel/taste like, and try to have “a little bit of everything” in each bite.
- Keep repeating the pattern- Cake, blueberries, strawberries, until you run out of ingredients.
- Congratulations! Once you are done blowing up your facebook with your new “creation” (no one cares,) Go make your Panna Cotta.
C. Panna Cotta
The discovery of this recipe goes to my anonymous friend K. Further credit goes to its original poster- Barabara Over at Barbara Bakes. (Go over there and love her for me)
Anyway, I’ve come to realize that this recipe is also hackable. (A hack within a hack… this is starting to sound like Inception).
How? Well as long as you have 8 cups of liquid, you can adjust the ratio of cream to milk- which you might want to do to make this less fattening. (Just don’t use skim milk- please. What’s wrong with you??) For my first run, I used 4 cups of milk and 4 cups of cream, and added a pinch more gelatin because I was paranoid. While a higher cream content will give you a thicker “mouthfeel”, this still worked out well! That aside, what I’ve reproduced below are Barbara’s original proportions, as this will give you the creamiest, richest panna cotta.
Vanilla Bean Panna Cotta
2 cups (240 ml) whole milk (hackable)
2 tablespoons (two packets) unflavored powdered gelatin (hackable- can be made vegan, or kosher)
6 cups (720 ml) whipping cream (hackable)
1/3 cup (80 ml) honey (Also Hackable. I used agave, and upped it to taste.)
2 Tablespoons White Sugar
2 teaspoons vanilla (You can also use vanilla bean paste, or just add more vanilla cause you like it. I did)
Pinch of salt (to taste!)
Pour the milk into a bowl or pot and sprinkle gelatin evenly and thinly over the milk (make sure the bowl/pot is cold by placing the bowl/pot in the refrigerator for a few minutes before you start making the Panna Cotta). Let stand for 5 minutes to soften the gelatin.
Pour the milk into the saucepan/pot and place over medium heat on the stove. Heat this mixture until it is hot, but not boiling, about five minutes. (whisk it around a bit too).
Next, add the cream, agave, sugar, vanilla and pinch of salt. Making sure the mixture doesn’t boil, continue to heat and stir occasionally until the sugar and agave have dissolved 5-7 minutes. It could take longer with this much liquid, so be patient.
Remove from heat, allow it to sit for a few minutes to cool slightly.
D. Assembly, Part II.
- GENTLY pour the liquid panna cotta over the top of your cake and strawberry layers. Ignore any calls for help- we are attempting to drown our cake sculpture on purpose. Stubbornly, it’s going to float. Don’t worry. [ As said in the outset, if this deeply disturbs you, then give yourself enough time to make/chill each layer of the trifle individually]
- Chill until solid, a minimum of 4 hours. I left it in overnight, to be safe.
::MAGICAL OVERNIGHT TRANSITION::
- Good morning, my fledgling chef! Take a look at your creation, nestled in the refrigerator among the crispy and half-consumed. The solid components of your trifle closest to the surface , through prolonged contact, have acquired the same contagion that plagues your 3 week old baked asparagus. They are crusty, and grainy, and dry! Surgery will be required. Remember what we said way at the beginning?
- You can do one of two things: A) Slice the crusty bits off with a sharp paring knife, and eat them! or B) Make a small batch of panna cotta and pour over the top, to cover the “raw parts”.
- I went with option A, because I’m just too lazy. Once you are done “cleaning up” the surface, prepare to decorate. It’s best to do this shortly before you need to present it, so it stays “fresh” Here’s how you do it, with whipped cream.
- Cream (About 1.5 Cups)
- Gelatin- 1/2 tspn, dissolved in 1tbspn hot water.- OPTIONAL
- Sugar- to taste
- Vanilla- to taste
- Salt- just a tiny pinch
- Put a metal bowl in the freezer for a few minutes. It must be COLD.
- Combine Vanilla and Cream in your bowl
- Begin beating the cream, until it begins to thicken slightly, almost peaking.
- Dissolve 1/2 tspn of Gelatin in about 1tbspn of hot water. (this is optional. It’s just a trick to keep the whipped cream from “melting”)
- Drizzle in Gelatin as you continue beating the cream
- Add a pinch of salt, and pinches of sugar, tasting as you go.
- The cream is done when it is stiff, and forms stiff peaks, but isn’t clotted or separated.
- Don’t overbeat! You’ll end up with butter instead of cream, and that sucks.
- Take your newly creamed cream, and spread it all over the top of the recently amputated trifle. Pack it in and level with a spatula.
- At this point, you are free to decorate the top of it with whatever you wish. I used strawberries, that I cut into nice shapes and arranged.
- Bring it to your party. Try not to get too big a head 🙂
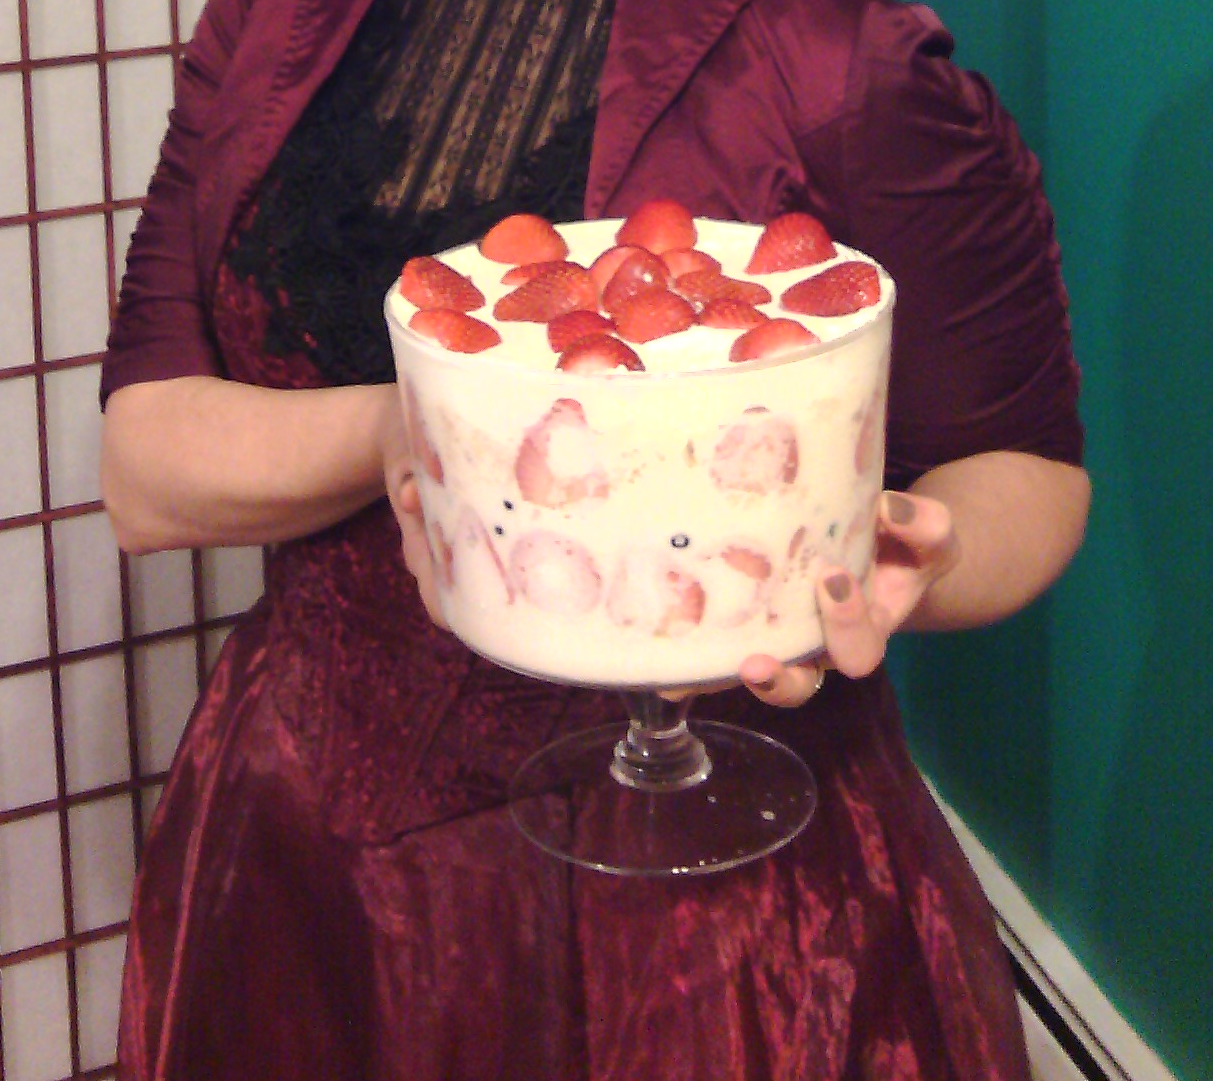
WHEW. That was a really long post. Well, at least its over now. Here’s a photo of (part) of me in some kind of wierd Victorian get up, holding the trifle!
Next up? An SCD and Candida Diet GOAN CURRY PIE. (Yes, I’m serious)
